All occasion card · Cards · Embossing · scrapbook page layout · SOTM · Thin Cuts

Sunshine Birdies March CTMH SOTM blog hop.

blogbadge

Hello and welcome aboard our Australasian Close to My Heart Blog Hop.

If you have arrived here from Vandra’s virtual CTMH craft room then you are in the right place.

If you landed here by accident, or from my links, no problem, please join in by following the link at the end of this post.
March2016SOTMToday I would like to share with you a creation which features Close To My Heart’s March 2016 Stamp of the Month.


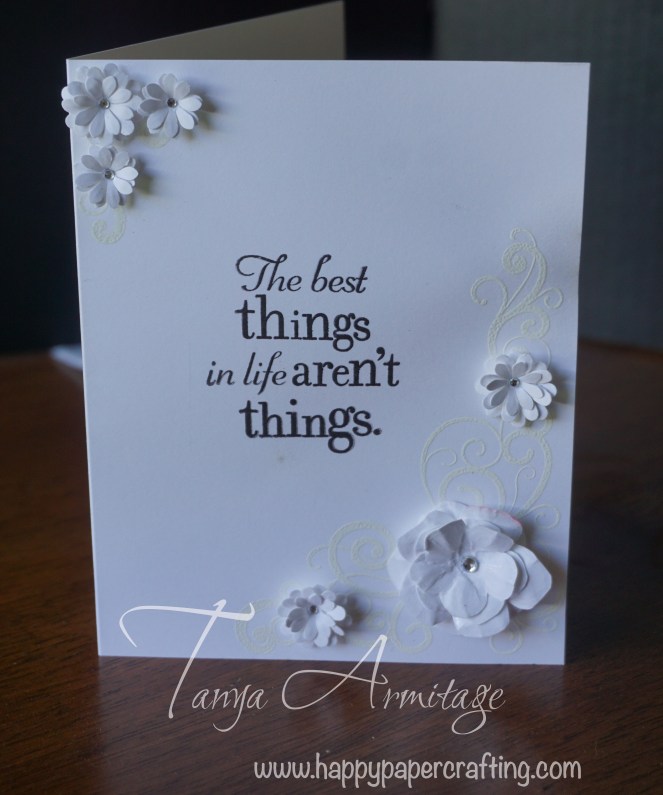
I have three projects to share with you today using this cute stamp set.


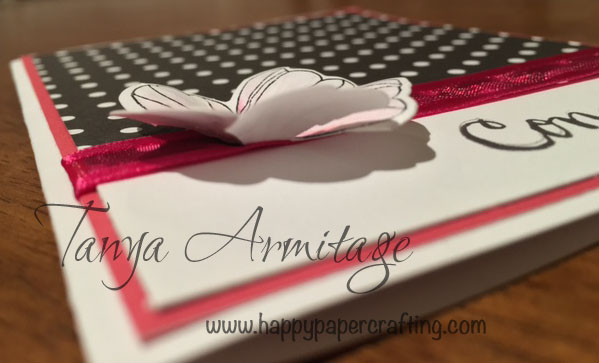
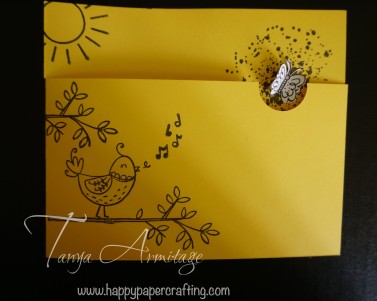
The first card I kept simple.  I have used a 5″x12″ piece of card scored at 6″. I have then cut from the front of the card 1 1/2″ off from the top. I have then used the 1 Inch circle punch to cut a semi circle in the the card. I then stamped the images I wanted onto the front and top of the card. I stamped on daisy white a butterfly and then hand cut it. I used the Ink Blot stamp set behind where I wished to place the butterfly. I have then using liquid glass glued the body of the butterfly to the card. This is the finished product. I know it is simple and plain but is a great quick and fun card to do with the kids.

march SOTM beginners

The next card I made is a step card. I have coloured the birds in with ShinHan touch markers. To create the clouds I used the Springtime wishes Thincuts. I placed the thin cut under the card stock and then using the sanding tool sanded the shape into the card stock. I then used the same thin cut to cut out a piece of daisy white to look like a cloud. I found doing this made a great outline and made them pop and looked fluffy. The one thing I love about this thin cut set is you can use your imagination to make them into other shapes. I then finished this card off with a trim of Silver Shimmer Trim. Here is the finished product. If you would like a detailed instruction guide then please contact me.march sotm step card copy

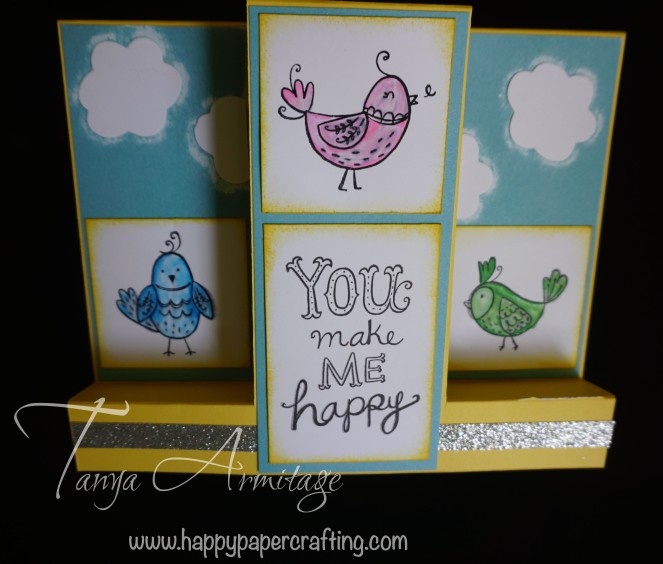
When I first saw this stamp set the butterfly at the top jumped out at me. I then thought of Winnie the Pooh and the the buzzing bees. So I had to create a fun page using it for photos of my friends youngest. As I used Black card stock for the page I used gold embossing powder for the sun stamp and White embossing powder for the butterflies to ensure they stood out. I traced and cut out the Winnie the Pooh and then using a handmade template I sponged white pigment ink to form the dots leading to the butterflies. I have stamped the sentiment on the page and added the butterfly to ‘S. I love how our stamps are clear. It makes lining them up to do this so much easier than the old red rubber stamps.

If you have seen any of my previous posts. I can’t have a butterfly flat on the page. So again I have cut out a butterfly and glued the body down allowing the wings to have a 3d effect. March SOTM single pagemarch sotm flower close copy


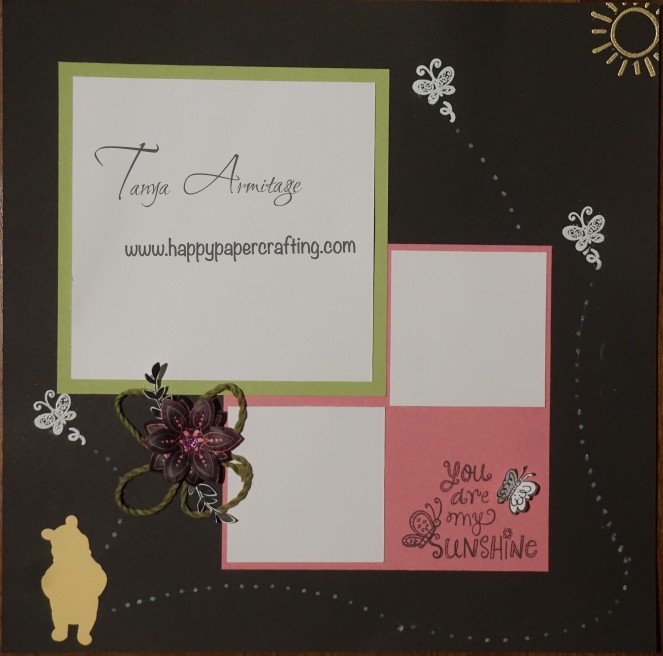
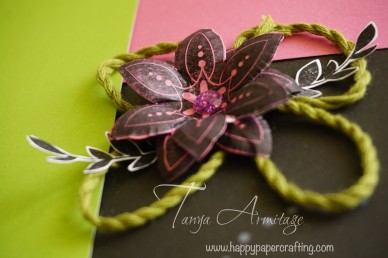
I have added more dimension to this page by adding an embossed flower, leaves and twine. Here is a close up of the element.


Thank you for taking the time to read my post. I hope you are inspired to do some of the ideas.

This exclusive Sunshine Birdies stamp is only available during March 2016.

It can be yours for just $7.50 with a qualifying order of $75 or for $27 if ordered separately from your CTMH consultant.

If you do not have a consultant please contact me or place an order here Tanya Armitage CTMH page.

I would love for you to leave me feedback before moving on to Shaunna’s Passionate about pages. Don’t forget to share and pin this post.

Enjoy the blog hop and Happy Paper crafting everyone

Tanya


tanya.armitage@me.com

0407581163

tanya.armitage.ctmh.com.au


Advertisement
All occasion card · Cards

To be or not to be ruined?

Sometimes we do a project and things just don’t go as to plan. With this card I had a few minor mistakes that I thought would look good, only to have at the end of it something happen and I went NOOOOO!

After stamping the sentiment I was glueing the flowers in place and didn’t realise that me being me had ink on the outside of my pinky. (Those who know me well will realise I am a mess. I often spill something or get myself dirty all the time) So when I placed that flower down my hand rested on the card and bam, black little dot appears under the sentiment, just like that pimple as a teenager that made an appearance before a big event with lots of photos.


best things card2

What to do what to do?

So I could try to cover it up with some Bling, flowers or other element. The spot where it is I don’t know if another element would really work there.

I could try and dump it. I could say damn this card is ruined and just start again. However I didn’t want to waste all my work.

I could also just leave it. Which is what I decided to go with. I had a few reasons behind choosing this option.

  1. I didn’t like the first two options for fixing it.
  2. I could show you all that these things happen to us all and
  3. I try to find the positive in most things. These little imperfections don’t ruin the card they show someone that I took the time to hand make this card. It shows everyone that it isn’t store brought and that it is personal.

So what would you have done? Cover it, Dump it or leave it?

Shhhhh  don’t tell anyone but I did cover one little mistake up, the large flower. When you use an embossing tool the paper needs to have enough give for it to be pliable. I find it needs to have many separate petals or if not you will need to either cut them or use a little water spritz to help make it pliable.

This particular flower I forgot to spritz and when working with it caused a little tear in the base. I knew it was going to be stuck down on this particular place and I could also add a bit of bling to ensure it would’t be seen. (Phew crisis averted) Play around with the embossing tools and many different forms of flowers and you will see what works for you.

If you are a CTMH buyer you have seen our catalogues, if you haven’t feel free to hit annual ideas tab and the seasonal expression tab on my home page to download to browse at your own leisure. There are some fantastic stamps there.


For this card I have used the The best Things Stamp set. This stamp set is not featured in any of the CTMH catalogues but is found on my OBA. There are a few other stamp sets that do not appear in the catalogue so PLEASE take some time to browse all the stamps sets available here.

I hope you like this card and have learned a bit from my mistakes.Feel free to share your experiences with a “ruined project”.

best things card

All occasion card · Cards · scrapbook page layout · SOTM · Thin Cuts

La Vie En Rose Australasian blog hop

Hello and welcome aboard our Australasian Close to My Heart Blog Hop.

If you have arrived here from Denise’s scrap stamp share then you are in the right place.

If you landed here by accident, no problem, please join in by following the link at the end of this post.

Today I would like to share with you a creation which features Close To My Heart’s La vie en rose paper pack. I just love this paper pack. Not only is the rose page stunning but there are some black and white pages that can be very versatile and suit all ages and genders.

rosepage copy

I have kept this simple for a quick and easy layout. The idea is based on idea 2e from the Reflections how to book. This page would be great as either a title page or a left hand page. If you haven’t seen one of these how to books before I recommend you have a look at your consultants. They give you so many suggestions that can be modified for page layouts and can give suggestions for companion layouts that allow you to create amazing Double page spreads.

The images stamped are from  the January 2016 stamp of the month. I have added a bit of sparkle with the silver shimmer trim. As I stamped a border I felt it needed a border at the top too. As I have said this is quick and easy to do and can be modified to suit your needs. I hope you give it a try.

I have also created a card I hope you like. I have used cotton candy card stock to edge the card as well as white daisy for the bottom and the stamped image. The image is from the brand new Springtime Wishes stamp set. I have used the fantastic new Springtime Thincuts to cut out the shape of the flower and then have stamped the image onto the die cut. I just love our stamps being acrylic as it allows you to see where you stamp on the cut each time creating a near perfect fit. Watercolour pencils were used to add a light colour to the image.

I have cut along some of the petal lines on the bottom of the stamped image.  This is so that when I use the embossing tool it allows the paper to curl without tearing. Remember when you emboss to use the foam matt. The image below hopefully can show you the effect I was going for.roseclosecard copy

I have added a gem to the centre of the flower and coloured it to add a bit of bling. To hide the join of the white card and the paper I have used ribbon. Sometimes you do not want that hard edge of a join and ribbon or trim are great ways to hide this. When I stick ribbon to my cards or pages I use liquid glass. This ensures that it will not move.


rosecard copy

This card is very quick and easy to do. I love simple cards as they can be so effective and suit all crafting abilities.

Thank you for stopping by. Please leave a comment before you hop on over to view the fabulous ideas that Leah will share at Cameron’s Corner.

If you haven’t got a consultant already please contact me on 0407581163 or tanya.armitage@me.com

Happy Paper Crafting everyone

Tanya

All occasion card · Cards

Love embossing

Have you tried embossing?

Today I will talk about two ways of embossing. There are variations and further ways to improve on these techniques but I will be talking about the basics today of heat embossing with powder and dry embossing with folders. I love both equally and have a project using both techniques.

I remember heat embossing when I was a child with my mother. We didn’t have the heat guns back then. What we used to do was turn the toaster on and hold the card stock above it. That idea still works today so if you can’t afford a heat gun just whip out the old toaster and give it a go.

To begin have a piece of a4 paper with a fold in the middle handy. Stamp your image or sentiment with the Versamark Stamp Pad. Then using one of the embossing powders cover the stamped image with powder. Tip the excess onto the a4 paper and tap the back of the card to ensure all excess has left the area around the image. Then pour the powder back into the container. By having the fold in the paper to begin with that acts as the funnel and ensure it is easy to pour back into the container ensuring you are not wasting any. Then using your heat gun heat the powder so it melts.

If you are using a toaster then do heat from underneath. Also remember when using any heat instrument keep the paper from an element as it can catch fire. Sorry just had to put that here as I don’t want to be responsible for not adding a warning.

When dry embossing most crafters will have a big shot or a cuttlebug. I have the big shot and find that it is extremely sturdy for all my needs. Do not fret if you do not own one of these machines. You can still use embossing folders. All you need is a rolling pin and a hard surface. Place your card stock in the embossing folder and press heavily on the rolling pin to add pressure as you roll it over the entire card. That is all those expensive machines are doing anyway.

Give it a go and see if you can get the same results. Have you got any other tips like this you want to share with me? Either comment below or email me at tanya.armitage@me.com and share your tips on what you use.

Below is a card that I have used both heat embossing and dry embossing on. I have left a blank space in my embossing to stamp and heat emboss the sentiment. If you would like the instructions to make it simply make a purchase from My OBA before January 31 2016and I will email them to you. There is no minimum order requirement for this.

I hope you give these ideas a go and share your thoughts below.

Happy Paper Crafting everyone

Tanya

0407581163

tanya.armitage@me.com

All occasion card · Cards · SOTM · Uncategorized

Cards with a splash of colour

Hi everyone and welcome to my first post for 2016. I have much happening in my life to keep me busy. I have undertaken the role of activity coordinator for Tiny Tappers; a group that promotes coordination and confidence through dance/movement for children with disabilities. It is a wonderful group and will keep me on my toes all year.

Despite this I have made myself a promise to escape the stress of life through crafting rather than reading. So you will be seeing more of me. I am not sure if I will save money buy not buying books because I may just spend the money of new craft supplies. oh well but a lot of fun to be had.

Speaking of new craft supplies the new year has brought with it a new Seasonal Expression 1 idea book. You can view and download it from the link. As usual each month there is a new Stamp of the Month. This month it is the gorgeous Beloved Bouquet stamp set. This Stamp set is stunning and has so many uses. It will be one I will constantly use. You can purchase this stamp set for $7.50 with any qualifying purchase or for $27 full price but only through January.

jan16som

Sometimes you do not want to keep your cards simple. Sometimes I can find paper can distract from the impact of a stamped image. I am not sure if that is just me or if others find this as well.

I had a lot of cards to make before christmas and wanted some cards that were quick and easy. I came up with the below cards. The one on the left is coloured with watercolour pencils and the one on the right I left monochromatic. I personally feel that the monochromatic pops more against the colour than the other. What do you think?

I have sponged some colour across the middle of card and then stamped the image over the top. I have raised the flower just to give it some depth.

When I sponge I find I get the best results to add ink to my sponge and rub a little off on scrap paper first before I then apply it to the card. This helps eliminate the risk of getting splotches of heavy ink in some areas.

I also find putting pressure on the song and applying in a circular motion allows for a much smoother and even finish. I do like to stamp the envelopes and I have done so on only two corners of the cards.

If you would like the instructions to make this card please contact me via email: tanya.armitage@me.com

Below are some more cards I have made using the same style. As you can see they are simple but effective. Please comment and let me know what you think and share some of your own cards using this technique too.


I hope you all give this a try this weekend. Happy paper crafting everyone

Tanya Armitage

0407581163

tanya.armitage@me.com

All occasion card · Cards

Minnie Mouse Cricut Card.

miniemouse card

Today I want to share with you a card I made at the request of a friend. She wanted a Minnie Mouse card made for her cousin who is turning 1. I had fun making this card. It was quick and easy and a great way to use up some scraps for Minnie mouse.

As you may be able to tell from my previous post. I love the Disney characters. So yes I own a few of the Cricut cartridges digitally. This Minnie mouse layered image come from the Disney- Mickey & friends Cricut cartridge. I set the size at relative 4″. If you are going to try this and are new to Cricut, using Relative dial size automatically sets each item for cutting to be set at the size to match the black base/shadow image.

The card was made to measure 5×7. I cut a piece of black card stock measuring 4¾” x 6¾”. I then cut a piece of white card stock to 4″x 5¼”. This white piece I then embossed with the dot embossing folder.

I followed the assembly instructions in the handbook for Minnie mouse. I Attached her to the embossed card stock. Adhered the black card to the 5×7 card and then attached the embossed white on an angle to the black card. I feel that by placing it on an angle adds a point of interest for the card.

I then glued the balloon to the position I was happy with and then glued the string down. I used liquid glass to attach the string, I find when sticking fabric down it is best. I just get a little bit to the tip and then wipe along where I want so there is no leakage onto the project.

I had some black and white spotted ribbon and made a bow and positioned it in the corner of the white embossed card. I tried to make sure none of the ribbon was outside the card space as I didn’t want to squash it too much when placing in the envelope.

I hope this inspires you to create some cards this weekend. Please feel free to pin this to Pinterest for future reference and to share it with your friends.

All occasion card · Cards

Butterfly Gap Card

This card uses tone on tone and random stamping techniques. The Butterflies are attached to give the card the 3D look. Uses CTMH stamps and card stock and Cricut cartridge. It is very quick and easy. Give it a go!
Butterfly Gap Card

Hi everyone, Thank you for taking a look at my very first Blog post. I was thinking of what to share and decided to share this card. I came across the idea of gap cards in an old magazine and combined it with my love for butterflies.

When I am not scrapbooking or making gifts and cards for special occasions, I am making cards for all occasions. Besides being girly I love butterflies in my projects as they can be used for many different occasions. There have been many times where I have the intention of making a specific card for someone but sometimes time gets away from us and our plans do not eventuate. By having all occasion cards on hand I am able to use one when these instances occur.

This card is quick and easy and you can use it either this exact card or basic design for many occasions.

I began by trimming two strips from the front of a card. First 1 1/4″ x 5 1/2″ and the second at 1/2″ x 5 1/2″.

The second strip will not be needed for this card so you can save it to use on another project.

stamp backgroundCut Two pieces of cotton candy card stock (or any colour you     choose), 1 measuring 3 1/2″ x 5 1/4″ and 1 measuring 1″ x 2″. From the first piece trim a piece off measuring 1″ x 5 1/4″. Trim a piece of colonial white card stock measuring 1 1/2″ x 2 1/2″. Sponge the colonial white piece with cotton candy ink.

Stamp background using the stamp set Your Own Kind of Wonderful, I picked two butterflies and used the ‘Tone on Tone’ technique to create my own pattern (Tone on Tone is using the same ink colour as the card stock). Using the random stamping technique I stamped the butterflies alternating them. To give it a more interesting feel I stamped over the edges. I think it looks great. Remember this technique next time you can’t find the exact paper you are looking for. I then attached the these stamped pieces to the card.

From the Artiste Cricut cartridge, Cut 2 solid butterflies (accent 4 shift ‘spring’ image) and 2 filigree butterflies (accent 4 shift ‘K’ image). To assemble the butterflies you slightly bend the wings, doing this will keep the wings away from the glue and give them a 3D look. Use liquid glass or another adhesive on the underbelly of the butterfly. Attach this to the solid butterfly.

Stamp your sentiment onto the Small piece of cotton candy card stock. I embossed mine with white embossing power. Then attach to small colonial white card stock.

Line the loose piece up with the card so it reforms the original card with the 1/2″ gap. put glue on the four corners of the butterflies and place them as to join the loose piece with the main card. Using 3D foam tape to attach the sentiment to also join the two pieces. You have now completed your card. Adjust the wings of the butterfly so they sit to your desired look.

I hope you had fun assembling this card.