Cricut

Faux Leather Earrings

Hi today I am going to share with you a quick and easy project to use with your Cricut machine, Faux Leather earrings. They are very simple and quick to make and they make fantastic gifts. You can make this on the explore or maker machines as you only need the fine point blade.

You will see links in this project which I will get commission for if you make a purchase using them. This commission helps me keep making projects to share with you all. The ideas and thoughts of the products I share are my own.

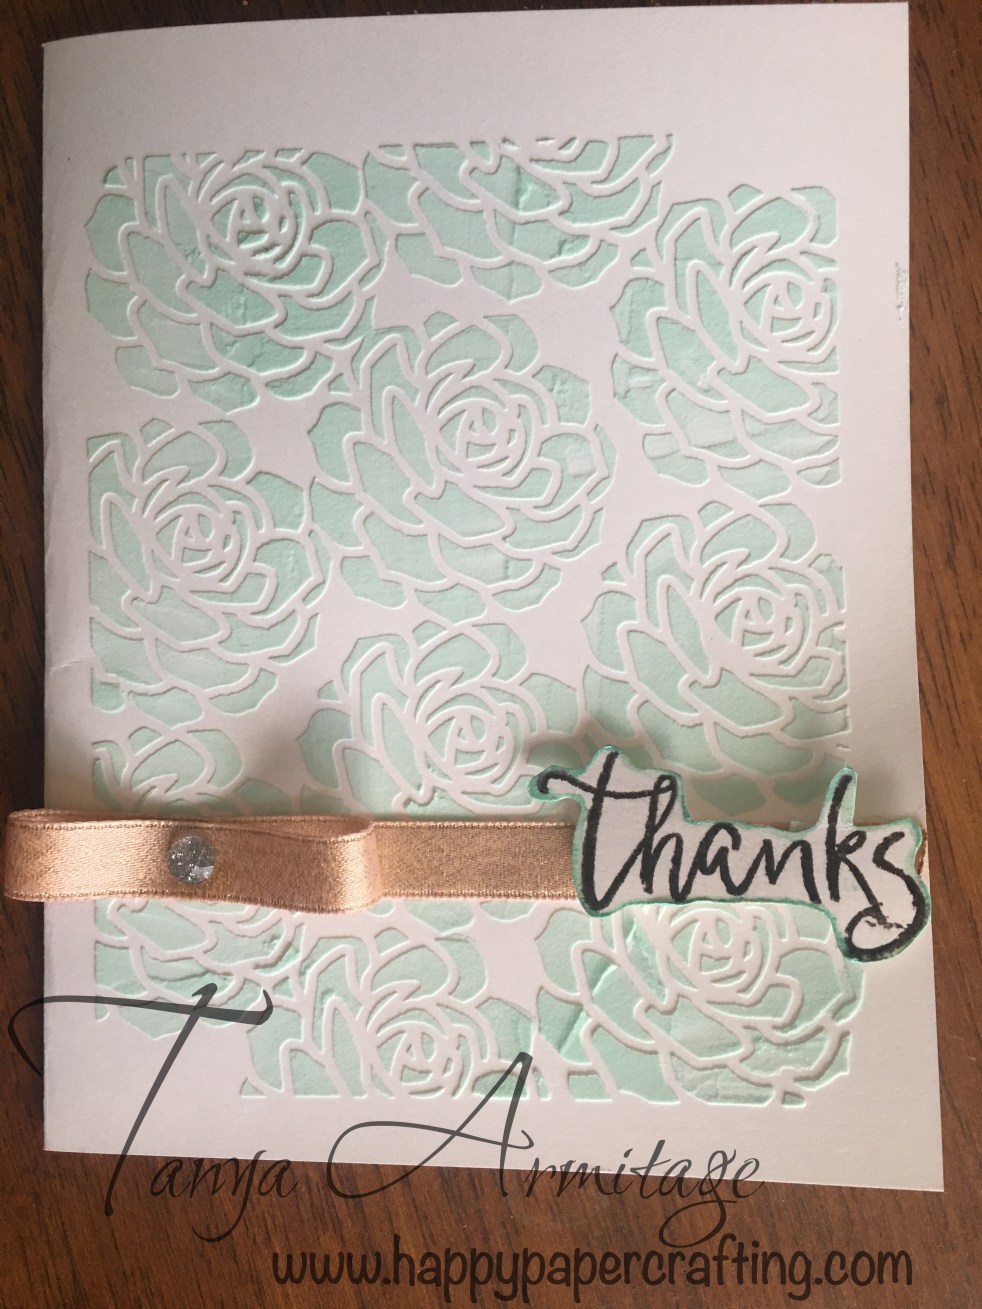
Here is a look at the final product of today’s project.

If you want to recreate these at home you will need the following items

I prefer to use Cricut Faux Leather for this as it is light weight and is comfortable for those wearing them. If you do not want to use two different Faux Leathers you can do the top layer with Iron on for a similar look.

The file Wood Earrings SVG comes with 48 designs and a commercial license. The commercial license means that you are able to sell anything that you make using the SVGs.

To begin this project you will need to upload the design of your choice into Design Space and add the design onto your canvas. Ensure that you have two on your canvas as one will become your back layer. Select one of the images and select the Contour button from the bottom right hand corner of your screen. You want to hide all contours except the top circle which you need to put the jump ring through.

To cut the earrings you will need to place the Faux Leather face down on your Cricut Standard grip mat. For this particular project you do not need to mirror your image as this item is symmetrical. However I still do choose to mirror more for me to be in the habit so that I do not forget for a project that requires it.

From the project mat screen choose to make 2 project copies (to make a pair) or as many as you need. Ensure you have the fine point blade inserted and for the explores turn your dial to custom and then choose Faux Leather (Paper Thin). For Makers choose Faux leather (Paper Thin) from the materials screen. Once they are cut you then add then thread the jump ring through the hole and then attach to the earring.

I hope you like this project and let me know if you gave this project a try.

Thank you for visiting and Happy Paper crafting

Tanya

0cdfa0c9fbc9a8f629a389a45f6b671a7a9e83ae8e5d99e78c

f0d01515ec375427ef8d7cb48e412344124cc913643122de99

All occasion card

Succulent Texture Paste Card

Hello everyone today I have a card I created with texture past and reinker. It is very easy to make.

If you want to make this you will need:

Making The Stencil

I firstly began by designing the stencil in design space. I chose the succulent image from the Flower Market Cartridge. I placed one image on my canvas and removed the silhouette backing. I then selected the contour button and hid the outside line of the image. By doing this it stops the whole flower being cut and only the inside petals.

I duplicated the image so I had enough images to form an image I thought would be great for a stencil. I then selected all the succulent images and selected weld. This makes them all one image. I then inserted an square and modified the shape until it was a rectangle and would cover the succulents in a way I wanted. I then selected both the succulent and square image and selected slice. I then deleted the parts I did not want to keep.

If you want to keep the image on a larger sheet then you can cut it as it is. I wanted to keep a smaller piece so I added a larger rectangle and attached the images. If you do not want to do this yourself feel free to use my file in design space Here.

I the used the cricut to cut out the design.

Making the card

On a mat on my table I used a small amount of the texture paste. I added two drops of the reinker to the paste and mixed it through. The more reinker you add to the paste the darker the colour. I then placed the stencil over the card. I then used the palette knife to spread the paste evenly over the stencil. Once it is all covered I lifted the stencil off and let it dry.

I used the thanks from the October SOTM set to stamp thanks on a scrap piece of white cardstock and edged it with the Mint Shimmer brush. Once the paste was dry I then stuck the ribbon down with Liquid glass and used 3D foam tape to stick the word thanks down. I then added a ribbon bow and placed a glitter gem in the centre.

This is a real cute fun technique to try and I hope you all have a try.

Please feel free to leave a comment of your thoughts on this project before you leave.

Thank you for taking the time to look at my project

Happy Paper Crafting

Tanya

Succulent texture card

All occasion card · Cards · Embossing

Silver & Gold CTMH Australasian Blog Hop

blogbadge

Hi and welcome aboard the Silver and Gold Close To My Heart Australasian Blog Hop. If you have arrived from aMAZing Close To My Heart Creations than you are in the right place. If you have stumbled upon this page than please join in and take a look at the amazing ideas that the Australian Consultants have designed.

Today we are featuring the Silver and Gold papers. I love these papers for their neutral tones but also for the gold foil designs, Which I have used in my design today. It will not matter what colour you decide to decorate this Christmas these papers will suit all your crafting designs if that be scrapbook, off the page or cards. Screen Shot 2017-11-15 at 12.17.51 am

The design I have done today Have kept simple but I have used different techniques to make it a fun card to make.

Be Merry Silver and Gold CTMH card

Firstly I have used a card blank and ruled in pencil a line at 1 3/8″ from the edge of the card. This was so that when I placed the Be Merry Thincuts on the card blank I could ensure that the cut out would be even. I then used the partial die cutting technique. I placed the card black on the Big shot ensuring that the line and base of Be Merry Thincuts were off the platform. I then ran it through the machine to cut the design in it.

I then scored the card at 1 1/4″ from the edge. This gave me a straight line to then cut the excess of the card blank away. (If you have a Cricut you can do this step easily and let the machine cut for you. Ask your consultant for a demonstration and how to purchase one).

Once the excess is cut away I then chose a piece of the patterned paper that I liked and cut a full Be Merry out. I then adhered a piece of the gold foil design paper to the front of the card. I then heat embossed vellum paper. I stamped the present border stamp in versa mark onto the Vellum. I then coated with clear heat embossing powder and heated.  As you can see this softens the good foil up when layered over. I then decorated the card with silver foil tape (you could use Gold) and added a bow to make it look like a present. I also then glued the Be Merry from patterned paper on top of the word on the card.

Clear heat embossed Vellum
This picture shows the subtle design on the vellum by heat embossing with clear embossing powder,

I then heat embossed a sentiment from the Gingerbread friends stamp set onto black card stock. I chose black as I felt it would make the Be Merry pop more. If you didn’t guess from this project. I love Heat Embossing. I am sure you will too.IMG_1021

Thank you for taking a look at my design. Please leave a comment before continuing along to Shaunna’s design at Passionate About Pages.

If you love this pack as much as we do please contact your Close to my Heart consultant. If you do not have a Consultant you can contact me here to order yours today.

Enjoy the ideas on this blog hop and Happy Paper Crafting

All occasion card · Mini Album · Off the Page · SOTM

S1711 Through The Year CTMH Stamp Of The Month Australasian Blog Hop

blogbadge

Hi and welcome aboard the CTMH Australasian blog hop. If you have arrived here from Creative Workshops by Rachel Stribling then you are in the right place. If you have joined us from this post don’t worry just click the link at the bottom of my post when you are finished and join the ride of amazing ideas.

Today I will be sharing an idea that jumped straight into my head when I saw November 2017 Stamp of the Month: Through The Year. I absolutely love the font used for the months in this set. I am a huge fan of script fonts. The great thing is it is only $7.50 with a qualifying order during the month of November.Screen Shot 2017-11-01 at 12.12.40 am

I know most of you will be thinking how often will I use this stamp set. However the Ideas shared today along the blog hop and the twists you can do on my design will have you using this stamp for many gifts all year round.

When I saw this stamp I wanted to decide how I was thinking of different ways I would use it. I know you could use it on frames for school pics or scrapbook layouts. However I though I would personally use it like a journal. I find If I set myself a goal and a time line I will strive to achieve it more than just an idea/wish. So I decided to create a mini album that has fold out pages. I decided to keep it small and have each side of card stock a different month.

To make this album you will need the following products.

  1. 3 sheets of Coloured Card Stock
  2. 1 sheet of B&T Paper (I used Basic Fudamentals which are at 30% saving for November)
  3. 1 sheet of White Daisy Card Stock
  4. Glitter cardstock, ribbon, shimmer Trim or anything you wish to embellish the project
  5. Ribbon or clip rings to join.

s1711mini album front cover

The front cover I decorated last and have used a image from the new You Are Here Cricut cartridge.

You will need to cut 6- 3.25″x12″ strips and 1- 3.25″x10.5″ from the coloured Card Stock. Then cut 12- 3″x3″ squares from both the B&T paper and White Daisy Card stock. Then you will need to cut 12- 7/8″x3″ strips from the white daisy card stock.

Stamp the months onto the 7/8″x3″ strips. I just stamped with Memento Ink. However,  you could also use versa mark and heat embossing powders.

Score each of the 3.25″x12″ strips as follows. Score at 5/8″ then at 1.25″. Move that score line to 3.25″ and score. Move that score line to 3.25″ and score and again move that score line to 3.25″ and score. Using a bone folder fold the score lines. They should fold together so that the small score lines (the first two marks) are the binding and the other pieces fold behind each other. On one side glue the white 3×3 piece near the binding and on the opposite side adhere the white square to to the panel next to the Tab. Adhere the month to the tab. When folded it should look like the picture below.s1711mini album open views1711mini album centre

Adhere the 3×3 B&T paper to the middle panel. Then score the 3.25″x10.5″ piece at 4.5″, 5″, 5.5″ and 6″ marks. Using a hole punch, punch holes in the binding area to be able to assemble. I found it easiest to go from Top and Bottom of each piece trying to make sure it was in the middle of the Binding area. This allowed me to easily punch the cover piece and assemble. You can join them all together with clip rings or with Ribbon.

If you feel you want the binding to be sturdier you can add a little bit of liquid glass to the small folds.

That is the album assembled.

What I intend to do is have the front piece that is seen my wish/goal for the month. The middle piece is a mount so I can add a photo either of the completed challenge or something that happened instead. The last panel that is hidden is for journaling. I will write if I achieved it, when, and what problems may have risen during the challenge.

s1711mini album single extended page

The great thing about doing this album with the new card stock is the different shading of colours font and back. It allows for a nice mixture of colours and interest.

s1711mini album centre opens1711mini album centre image

If you do not wish to do this as a goals/new years resolution album, you could do the same design for a brag book for Grandma or Aunts. A photo of the grandchild every month and what they did.

You could also do a Birthday Book and keep track of when everyone’s Birthday’s are.

Teacher Thank you gifts. Record what they did or what you loved most every month with the teacher.

If you do use it for a goals book you could make your goals on exploring your local area or trying something new every month.

Thank you for looking at my design. I hope it is something you feel you can recreate and will give a try. Keep an eye on my blog as I will be posting more ideas for this album and techniques with the Cricut. Remember this stamp set is only available this month through your CTMH consultant. If you do not have a consultant you can contact me here to order yours.

Please continue along this fun blog hop to Passionate about pages and see the amazing idea that Shaunna has designed for you.

Enjoy the inspiration and Happy Paper Crafting everyone

Tanya

All occasion card · Cards

“Little dreamer” Australasian blog hop

blogbadge

Hello and welcome aboard the Little Dreamer Australasian blog hop. If you have arrived here from Vandra’s Virtual CTMH Craft Room then you are in the right spot. If you have stumbled upon us or sent from my email list then please continue along the hop by clicking on the link at the bottom of this post.

          Today’s post features the absolutely stunning Little Dreamer Paper Pack. Screen Shot 2017-05-19 at 11.05.50 pm

This Paper pack has some gorgeous designs and I am sure the amazing ladies in this blog hop will have some amazing ideas showcasing the versatility of them.

My design I am showing you today is a Peek-a-Boo card. These are cute and fun cards and can be used for so many occasions. The Peek-a-Boo cards have a window in the front of the card that when opens allows for another image to appear there. Here is what my card looks like closed and when opened. Note that the image visible in the window when closed in actually attached to the background card stock.

I am using this card for a young girls second birthday who loved hidden images in books so I thought this style card would be perfect for her. I wanted to keep the card child like so I kept it simple and used the glitter complements. What young girl does not like glitter?

Peek-A- Boo card using CTMH little dreamer paper packet

Inside image of peek-a-boo card using CTMH little dreamer paper packet and complements

As you can see when opened the image that appears is a unicorn jumping over a rainbow. I fussy cut the paper and drew the rainbow on card stock and added bling from the complements pack.

The front of the card is decorated with Whimsy ribbon and cut outs using the cricut machine. The holes in the card were done using the Circle Thin Cuts, however you can do this with any shape thin cut.

I have added colour  to my Happy Birthday cut out with ink and sponge. If you wanted a brighter effect you could also use the markers or watercolour paints.

This card is really fun to make so give it a try.

Thank you again for coming along the ride of the Australasian blog hop. Please before continuing along our hop leave a comment. I know the other ladies will have some amazing ideas especially the talented Lauren Moore. Enjoy the ride and don’t forget to pin all the ideas for your inspiration.

Happy Paper Crafting

Tanya

Cricut · Embossing · Off the Page

Floral Floating Tea Cup

Hi Everyone,

The project I have to share today is the floral floating tea cup. I had seen few of these online and wanted to give it a try as I love making flowers and I love tea.

If you would like to make it you will need the following items:

If you do not have these collections you can use any flower or butterfly that you like. If you have these you can open the project here.

Once you have everything cut all flowers (10 of each colour) and the butterflies. I found it easy to put the pieces of flowers in piles by size. There are 7 pieces per flower with two being the same size. You can add more dimension to your flowers if you add ink to them.

Place the flower upside down on the foam mat and use the embossing tool to emboss the card stock. Start from the outside of each petal and push down as you drag the tool to the centre of the flower. The petal will curve up. Once all petals are done flip it over and create a circle in the centre and push down to get the shape you want. When you have each layer embossed for one flower glue each piece together using liquid glass. I find using liquid glass ensure the layers won’t move when you play with the petals for styling.

Add the yellow dot or a clear gem to the centre of the flower. If you use the clear gem use  a shinhan touch marker to add colour to it. Use a shimmer brush to add sparkle to the flower.

Follow the above steps for all flowers until all flowers have been assembled.

Using the pliers bend the fork so the handle sits against the inside of the teacup and the bottom of the fork sits against the saucer. Place some hot glue in the tea cup and place the handle of the fork against it. Then add glue over the top and side of the fork. Hold in place until glue is set. Be careful with this step so that you do not burn your fingers. If holding upside-down the glue can drip onto your finger. The heat from the glue can also travel through the metal of the fork and burn if holding too close. please be careful.

Ensuring that the tea cup is sitting near the middle of the saucer for weight distribution, add glue under where the fork touches the saucer. Push the fork into this glue and then cover with more glue. Hold in place until glue is set and it is stabilised.

To begin adding flowers or other decorations to this piece use hot glue to glue them in place starting at the bottom of the plate and working your way up into the cup. Don’t forget to also add some to the back of the fork or make leaves/grass to hide the fork.

Once all the flowers are in place bend the wings of the butterflies so they have dimension. Add a bit of liquid glass to the bodies and glue in place. Add the large butterfly to the top or handle of the tea cup using either liquid glass or hot glue whichever works for you.

I had a lot of fun making this project and look forward to seeing any you make

Happy paper crafting everyone

Tanya


Floating Teacup

scrapbook page layout · Thin Cuts

CTMH Hello Lovely Blog Hop

blogbadgeHello and welcome aboard our Featured Paper Hello Lovely Australasian Close to My Heart Blog Hop. If you have arrived here from Mez wood’s aMAZing Close to My Heart Creations then you are in the right place. If you landed here by accident, no problem, please join in and follow the link at the end of this post.

With yesterday being Valentines day I am sure you all have some wonderful photos you would like to preserve. Well today I would like to share with you this double page spread featuring the gorgeous Hello Lovely papers. I wanted to keep this layout simple and easy to complete so that even the beginners can give it a go.

hello-lovely

The page design is the Monologue design from the Imagine How to book. These how to books give you both the cutting guide and instructions for assembly. If you decide to follow this layout please note that I changed the 2nd B&T to colonial white card stock. Also I replaced cut “C” to shimmer trim.

On the colonial white card stock I have used the Charming cascades stamp set. I used the top part of the stamp only to stamp the hearts on the card stock. I did this so that there was an even pattern. I have then cut out the title with White Glitter Card Stock using the Celebrate Thin Cut. The rest is as simple as glueing the pieces down as per the instructions.

The great thing about the how to books is  you can turn the look around just by rotating or switching the pages around as per the example below.

hello-lovely-switch

The Hello Lovely pages are gorgeous and can be used in so many ways. If you continue on this hop you will see some amazing designs. But before you jump along please leave me comment. Thank you, now take a look at another idea with  Lauren Moore at CTMH Crafting.

Happy Paper Crafting and we look forward to sharing more ideas with you

Tanya


albums/accessories · All occasion card · halloween · pocket scrapbooking · scrapbook page layout

Halloween Ideas

Halloween is on Monday and after all the fun and dress up is over you will have some fantastic memories you will want to preserve. You then have to decide how you will present them. Many People still do the traditional lay out. There are so many fun and interesting things you can do with traditional layouts to make them unique. The example below shows you that you can have your journaling box on an angle to create some interest on the page. 16-he-jeepers-creepers-monsters-layoutWashi Tape can be used in so many ways. Here it is used to to look like you have just stuck the pictures down. This is a great idea to use for children, school, friendship or crafting/work photos. It looks similar to having photos stuck over your mirror/wall.

16-he-jeepers-creepers-wyw-layout-01

The new way to scrapbook is one that I love. It is a mix of traditional and pocket scrapbooking. You still have your traditional scrapbook pages but you can use the new pocket pages to add additional photos similar to a photo album.

16-he-jeepers-creepers-wyw-pocket-pages

By doing this it makes scrapbooking quicker and easier and allows you to use many photos in less room. I will talk about pocket scrapbooking in a future post.

Once all your Halloween scrapbooking is done you don’t have to pack away the little monsters. Remember your own little monsters will love to make, give or receive some fun monster cards. 16-he-jeepers-creepers-wyw-card-set

I hope you all enjoyed the many ideas you can do with your halloween photos. Please share your completed ideas with me. Don’t forget to take a look at my other halloween ideas.

Happy Papercrafting everyone

Tanya


If you want any information about the above projects or other CTMH products please contact me on tanya.armitage@me.com. I am more than happy to provide you with free information.


All occasion card · scrapbook page layout · SOTM

July SOTM ideas

Hi everyone I hope you are enjoying yourselves. I have been busy with my work and a friends wedding that I haven’t been able to do much crafting lately. As you know there is a different stamp available for each month only. The July Stamp of the Month is From the notebookScreen Shot 2016-07-04 at 3.07.57 pm

This stamp would be fantastic on any page layout or card. Also would be great for home made diaries. The following two ideas have been created by Close to My heart corporate office and aren’t they fantastic.

The different images layered/grouped together on the cover of the My creations black mini book look fantastic. Stamping the heart directly onto the paper background makes it look like the paper was printed with it on. The lined stamps make great journaling box that I am sure you will use over and over again in months to come.

There are so many different interactive page layouts and journal ideas around and in our how to books that I know this stamp will work very well with.

Remember this fantastic stamp set is only available during the month of July. You can purchase it for $27 by itself or you can receive it for the discounted price of $7.50 with a qualifying purchase. Take a look at my OBA for a few more great projects created combining this stamp set and the magical papers.

For more great ideas check out the following consultants blogs

Lauren Moore

Georgie Creates

DorisTaylor Creative Inspirations

Sandra’s Virtual Craft Room


Thank you all for taking a look. Please share your ideas with me on my FaceBook page 

Happy Papercrafting Everyone

Tanya


All occasion card · paper piercing · scrapbook page layout · SOTM

The long way home Australasian blog hop

blogbadgeHello and welcome aboard the CTMH June 2016 SOTM Australasian blog hop. If you have landed here from Vandra’s Virtual Craft Room then you have arrived at the right spot. If you stumbled upon this by accident then never fear just click on the link at the end of this post to continue the hop to all the other fantastic ideas.

Every month CTMH release a stamp set just for that month. The Stamp set available for June is The long way home. It is a cute fun stamp that you will see on this hop is very versatile. Screen Shot 2016-05-31 at 11.22.36 pm

The idea I will be sharing with you today is a simple page layout inspired by page 63 from the Reflections how to book. I live in tropical North Queensland and one of our local beaches has great views at sunrise. I love living here and thought I would document what I love about my home town so that my future family can see what I love about it and how it changes. I would love to see your home town featured on your page.

I chose not to use a pattern paper for the background but did not want to use plain colour. So I created a bit of texture with the Stitch Guide and Piercing and Embossing tool. I used the triangle to create a fun pattern in the background card stock. I also pierced a border on photo mat with the piercing tool. This is a tool I love so much and have done a few projects using it to create fun backgrounds. Take a look here and hereJune16 SOTM piercing closeup.jpg

This is a very simple layout and is quick to do. I have stamped the sentiment Love it here  and the combi van and attached to my project with 3d foam tape. Then sun and star have been stamped onto the project. I have then finished the project off by attaching a strip of Twine. June16 SOTM page

I hope you have like this simple project and give it a go. Please feel free to share your page showing what you love about your home town. It would be great to see all the wonderful parts of our country.

This stamp set is $27 if purchased alone or just $7.50 with a qualifying purchase of $75.

Contact your consultant for more information or contact me here.

Remember this stamp set is only available until June 30 so be sure to grab this awesome stamp set before the time gets away.

Please leave a comment before continuing on to Creating with Kara Davies whom I am sure will have a fantastic idea to share.

Thank you for taking the time to look at my page idea. Enjoy the rest of the Blog Hop and Happy Paper Crafting

Tanya Armitage

tanya.armitage@me.com

Online Business Address <——–click here