All occasion card · Embossing

SE1 last chance Australasian blog hop

blogbadge

Hello and welcome aboard our Australasian Close to My Heart Blog Hop.

If you have arrived here from Georgia O’Shea’s blog Georgia Creates then you are in the right place.

If you landed here by accident, no problem, please join in by following the link at the end of this post.

Today we are showcasing our favourite products from Seasonal Expression 1 catalogue. The stamp sets and papers will be retiring at the end of this month. So take a look at the blog hop and see if our favourites interest you.

Screen Shot 2016-04-19 at 10.11.43 pm


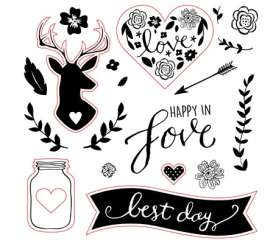
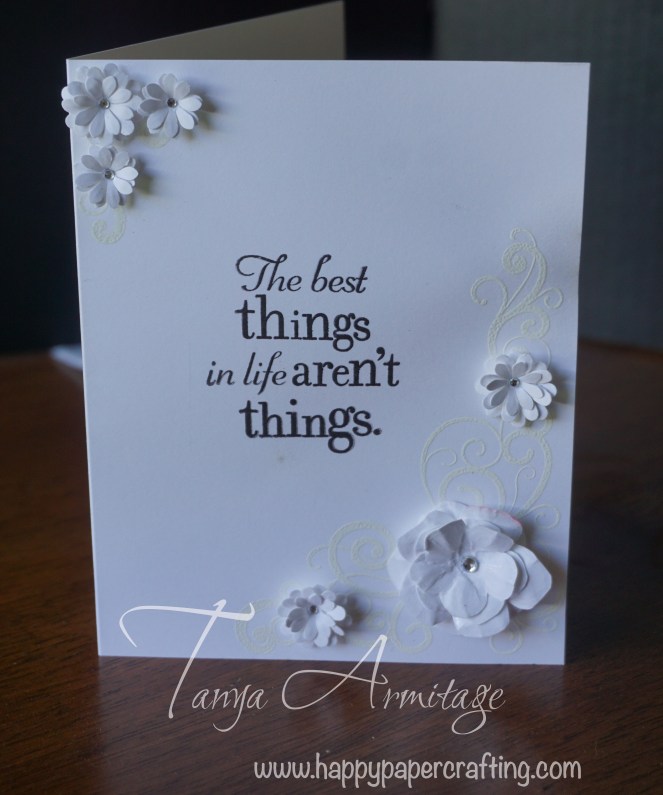
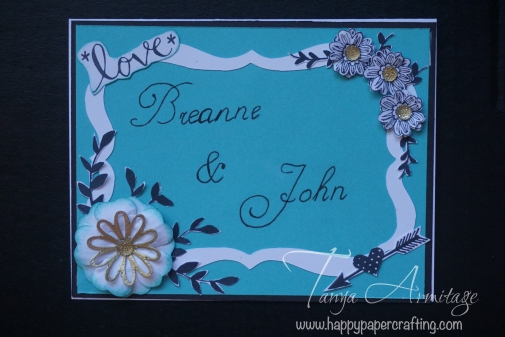
The stamp set I have used for this card is Woodland Romance. This is my favourite stamp set from the catalogue as I love the vines and flowers. Throughout the idea books there are little tips throughout and the one that is next to this stamp set I fully agree with.

“When scrapbooking my favourite photos I like to cluster beautiful details around them so they take centre stage”

This stamp set has so many little pieces that can pieced together to create beautiful details.

I have created a card for blog today but this idea can also be used on a page. As this card is for a wedding I decided to personalise it with their names on the front. However you could add a sentiment or if using the idea on a page add a photo.

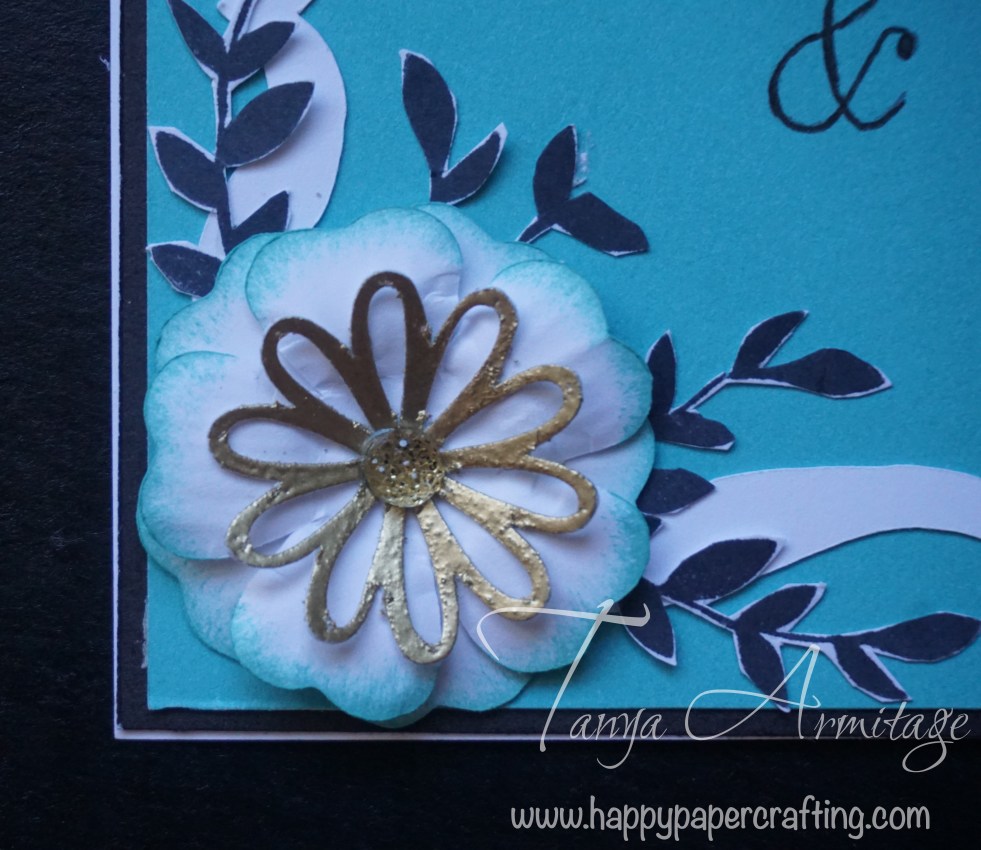
The ribbon frame is from the artbooking circuit cartridge, the Flower in the bottom corner
is from Art philosophy cartridge and the hollow flower is from Artfully sent.

cricut flowerTo turn the hollow flower gold I pushed it into the versa mark stamp pad and then embossed with gold embossing powder. I have used this technique before. You can take a look at it Share the Love.

I have added the vines from the stamp set behind the flowers for the clustered details. If you want to see the vines used in another project you can look here


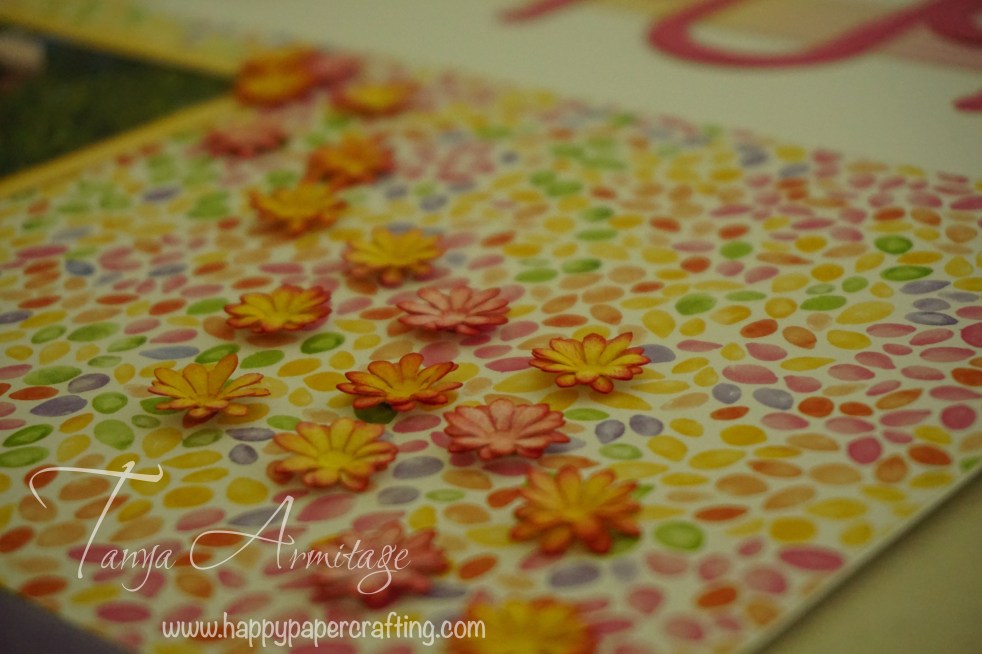
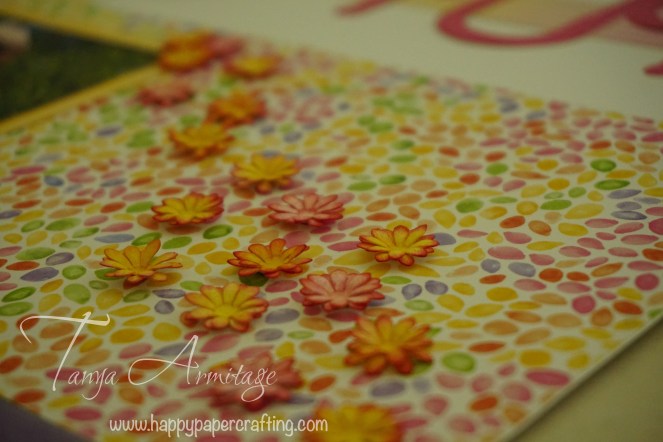
The small flowers in the top corner are stamped and then embossed to give them the 3D look. These make great little accents to any project. Here is another project I have created using these little flowers.  I have added vines to these flowers also. All flowers have been finished with Bling Gems Gold.

woodland romance card.jpg


Thank you for taking the time to look at my project. I hope you have seen just how fantastic this stamp set is and that you grab it before it retires at the end of the month. Please leave a comment before continuing to Vandra’s Virtual Craft Room.

If you have not seen the seasonal expression the you can view it here.

Remember this idea book finishes at the end of April. Some items have already sold out so be sure to grab the one’s that you love the most before they are gone.

If you do not already have a consultant than feel free to contact me for information about this fantastic company and their products. You can purchase this item and any other from my OBA.

Tanya Armitage

tanya.armitage@me.com


Advertisement
All occasion card · Cards · Embossing · paper piercing

Paper Pierced Background card

Hello Everyone. I created this card after reading the close to my heart blog. They have a competition running at the moment. This is what I created. If you want to participate you can read all about it here.


I was inspired for this card by a 2008 card by Amy Sheffer on pinterest. The card featured a stamp that had stitching design background stamp. I loved the look but didn’t have a stamp similar in my collection for this project. So I thought outside the box and came up with this solution.

#cards4jeanette

I first used the Tone on Tone stamping technique on the cotton candy card stock. To stamp on the Daisy White card stock I stamped in versa mark. This was so that it was clear and not so visible on the final product. I used the  Great Job stamp set for the background.

Once it was stamped I then used the Piercing and Embossing Tool to pierce the design on the card stock. I followed the edges of the design for piercing. I also pierced a border along the edge of the larger Daisy White card.

I then Stamped the flowers from the Woodland Romance stamp set on both cotton candy and Daisy White scraps using Memento Ink. I used Memento ink as it dries fast so when I wanted to emboss straight after I wouldn’t damage the image. I then fussy cut the flowers out. To ensure the flowers would easily emboss I cut the petals down to the inner circle of the image. Turning the flowers upside down I used the embossing end of the Piercing and Embossing Tool. I pressed hard on each edge of the petal as well as the centre of each petal. I then turned them right side up and doing small circle motions got the flower to turn up. I then layered two alternate colours together using Liquid Glass.

I then stamped the Happy Birthday sentiment from the Joyful Birthday stamp set on the large white card. The flowers were then arranged and adhered to how I felt look right. I attached ribbon to the two smaller white card pieces and assembled the card.

This month we have Stampganza happening. If you purchase and 2 stamp set you will receive a 3rd for FREE.1603-cc-stampaganza

If you purchased all three stamps used for this project you would receive the Joyful Birthday stamp set of free.

Thank you for looking at this card. I am looking forward to seeing what you create for #cards4jeanette. I hope you all try these fun techniques

Full instructions are available for any of my projects with a purchase from my OBA.

Tanya Armitage

0407581163

tanya.armitage@me.com

Embossing · scrapbook page layout

Kaleidoscope Double page spread.


Hi everyone, I hope you have all been creating great projects. This one I am sharing with you today is one I worked on for a while. It has many elements which will take you a while to complete. These are ones you can either keep in your albums or display in shadow boxes.

penelope double page
Double page spread using Kaleidoscope idea from cherish how to book.

The page layout was very easy and quick to put together. The idea is page 59 of the Cherish how to guide. It provides the cutting instructions and layout instructions. If you haven’t seen one of these books before they are worth buying. They give you so many ideas you can modify to create fantastic flowing layouts.

The title fun was cut with the artfully sent cartridge.

The Flowers and flower borders are from the Art Philosophy cartridge. The larger flowers have all been coloured with the watercolour pencils and cut from watercolour paper.

watercolour flower
Water colour flower embossed and layered.

The smaller flowers are from white daisy card stock and then coloured using a sponge and ink. To colour these I sponged the lighter ink from the centre swiping out and with the darker ink I start from the edge and quickly swipe to the centre; Just to add colour to the tip of the flower.

sponged flowers2
Sponged flowers scattered on page

Once the flowers have been coloured I then put them upside down on my embossing matt. Using the embossing tool I then emboss each petal. Turning the flower upright I use the tool in the centre of the flower to curl the flower up. (Stay posted I will post at a later date a video showing how to do this).

Using Liquid Glass place a small amount on the bottom of one flower and place so it sits off centre with the flower below. Using the embossing tool push the flower together. Once in place you can then manipulate the petals to sit how you wish.

sponged flowers
Sponged flowers layered to edge photo

I scattered the sponged flowers on the page and glued them down using liquid glass. I then placed the large watercolour flowers on the page and glued them down.

There isn’t much to this projects but to create so many little flowers and to colour the flowers does take a bit of time. It is an enjoyable project and I hope you give it a go.

Happy Papercrafting everyone

Tanya


Products used:

Kaleidoscope Paper pack

Sponge

watercolour pencils

paint brush

Honey ink

Cranberry ink

cotton candy ink

watercolour paper

Art Philosophy cartridge

Arfully sent cartridge


All occasion card · Cards

To be or not to be ruined?

Sometimes we do a project and things just don’t go as to plan. With this card I had a few minor mistakes that I thought would look good, only to have at the end of it something happen and I went NOOOOO!

After stamping the sentiment I was glueing the flowers in place and didn’t realise that me being me had ink on the outside of my pinky. (Those who know me well will realise I am a mess. I often spill something or get myself dirty all the time) So when I placed that flower down my hand rested on the card and bam, black little dot appears under the sentiment, just like that pimple as a teenager that made an appearance before a big event with lots of photos.


best things card2

What to do what to do?

So I could try to cover it up with some Bling, flowers or other element. The spot where it is I don’t know if another element would really work there.

I could try and dump it. I could say damn this card is ruined and just start again. However I didn’t want to waste all my work.

I could also just leave it. Which is what I decided to go with. I had a few reasons behind choosing this option.

  1. I didn’t like the first two options for fixing it.
  2. I could show you all that these things happen to us all and
  3. I try to find the positive in most things. These little imperfections don’t ruin the card they show someone that I took the time to hand make this card. It shows everyone that it isn’t store brought and that it is personal.

So what would you have done? Cover it, Dump it or leave it?

Shhhhh  don’t tell anyone but I did cover one little mistake up, the large flower. When you use an embossing tool the paper needs to have enough give for it to be pliable. I find it needs to have many separate petals or if not you will need to either cut them or use a little water spritz to help make it pliable.

This particular flower I forgot to spritz and when working with it caused a little tear in the base. I knew it was going to be stuck down on this particular place and I could also add a bit of bling to ensure it would’t be seen. (Phew crisis averted) Play around with the embossing tools and many different forms of flowers and you will see what works for you.

If you are a CTMH buyer you have seen our catalogues, if you haven’t feel free to hit annual ideas tab and the seasonal expression tab on my home page to download to browse at your own leisure. There are some fantastic stamps there.


For this card I have used the The best Things Stamp set. This stamp set is not featured in any of the CTMH catalogues but is found on my OBA. There are a few other stamp sets that do not appear in the catalogue so PLEASE take some time to browse all the stamps sets available here.

I hope you like this card and have learned a bit from my mistakes.Feel free to share your experiences with a “ruined project”.

best things card

All occasion card · Cards

Love embossing

Have you tried embossing?

Today I will talk about two ways of embossing. There are variations and further ways to improve on these techniques but I will be talking about the basics today of heat embossing with powder and dry embossing with folders. I love both equally and have a project using both techniques.

I remember heat embossing when I was a child with my mother. We didn’t have the heat guns back then. What we used to do was turn the toaster on and hold the card stock above it. That idea still works today so if you can’t afford a heat gun just whip out the old toaster and give it a go.

To begin have a piece of a4 paper with a fold in the middle handy. Stamp your image or sentiment with the Versamark Stamp Pad. Then using one of the embossing powders cover the stamped image with powder. Tip the excess onto the a4 paper and tap the back of the card to ensure all excess has left the area around the image. Then pour the powder back into the container. By having the fold in the paper to begin with that acts as the funnel and ensure it is easy to pour back into the container ensuring you are not wasting any. Then using your heat gun heat the powder so it melts.

If you are using a toaster then do heat from underneath. Also remember when using any heat instrument keep the paper from an element as it can catch fire. Sorry just had to put that here as I don’t want to be responsible for not adding a warning.

When dry embossing most crafters will have a big shot or a cuttlebug. I have the big shot and find that it is extremely sturdy for all my needs. Do not fret if you do not own one of these machines. You can still use embossing folders. All you need is a rolling pin and a hard surface. Place your card stock in the embossing folder and press heavily on the rolling pin to add pressure as you roll it over the entire card. That is all those expensive machines are doing anyway.

Give it a go and see if you can get the same results. Have you got any other tips like this you want to share with me? Either comment below or email me at tanya.armitage@me.com and share your tips on what you use.

Below is a card that I have used both heat embossing and dry embossing on. I have left a blank space in my embossing to stamp and heat emboss the sentiment. If you would like the instructions to make it simply make a purchase from My OBA before January 31 2016and I will email them to you. There is no minimum order requirement for this.

I hope you give these ideas a go and share your thoughts below.

Happy Paper Crafting everyone

Tanya

0407581163

tanya.armitage@me.com

All occasion card · Cards

Minnie Mouse Cricut Card.

miniemouse card

Today I want to share with you a card I made at the request of a friend. She wanted a Minnie Mouse card made for her cousin who is turning 1. I had fun making this card. It was quick and easy and a great way to use up some scraps for Minnie mouse.

As you may be able to tell from my previous post. I love the Disney characters. So yes I own a few of the Cricut cartridges digitally. This Minnie mouse layered image come from the Disney- Mickey & friends Cricut cartridge. I set the size at relative 4″. If you are going to try this and are new to Cricut, using Relative dial size automatically sets each item for cutting to be set at the size to match the black base/shadow image.

The card was made to measure 5×7. I cut a piece of black card stock measuring 4¾” x 6¾”. I then cut a piece of white card stock to 4″x 5¼”. This white piece I then embossed with the dot embossing folder.

I followed the assembly instructions in the handbook for Minnie mouse. I Attached her to the embossed card stock. Adhered the black card to the 5×7 card and then attached the embossed white on an angle to the black card. I feel that by placing it on an angle adds a point of interest for the card.

I then glued the balloon to the position I was happy with and then glued the string down. I used liquid glass to attach the string, I find when sticking fabric down it is best. I just get a little bit to the tip and then wipe along where I want so there is no leakage onto the project.

I had some black and white spotted ribbon and made a bow and positioned it in the corner of the white embossed card. I tried to make sure none of the ribbon was outside the card space as I didn’t want to squash it too much when placing in the envelope.

I hope this inspires you to create some cards this weekend. Please feel free to pin this to Pinterest for future reference and to share it with your friends.